Mounting a Removable Flash Drive on Ubuntu: A Step-by-Step Guide

Author: Baden
May 16, 2023
Removable flash drives, also known as USB drives or thumb drives, are a convenient way to store and
transfer data. When using Ubuntu, the process of mounting a removable flash drive is straightforward,
allowing you to access and manage the drive's contents effortlessly. In this blog post, we'll walk you
through the step-by-step process of mounting a removable flash drive on Ubuntu.
Step 1: Insert the Flash Drive
To begin, insert the removable flash drive into an available USB port on your Ubuntu machine. The
operating system should automatically detect the device.
Step 2: Check Device Detection
Open a terminal and type the following command:
baden@erb:~$ lsblk
Ok, when you run this command you may get a lot of output! So don't be scared, you'll know what to look
for on this step.
This command lists all the available block devices on your system, including the flash drive. The flash
drive is typically labeled as "/dev/sdX" (where "X" is a letter representing the specific device, such
as "a," "b," etc.).
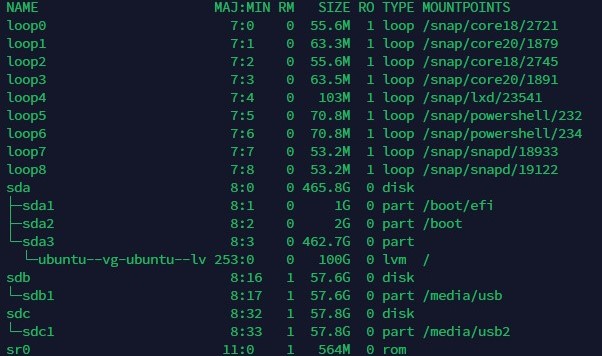
You should get something that looks a little
like this. In this
example there are two removable drives. Can you find them?
Step 3: Create a Mount Point
Next, you need to create a mount point, which is a directory where the contents of the flash drive will
be accessible. Choose a suitable location for the mount point. For example, you can create a directory
named "usb" in your home directory. Execute the following command to create the mount point:
baden@erb:~$ mkdir ~/usb
Step 4: Mount the Flash Drive
Now, it's time to mount the flash drive to the created mount point. Use the following command, replacing
"/dev/sdX" with the appropriate device identifier you obtained from the lsblk command:
baden@erb:~$ sudo mount /dev/sdX ~/usb
If the flash drive has a specific filesystem, such as FAT32 or NTFS, Ubuntu should automatically
recognize it and mount it accordingly. However, if the drive uses an unsupported filesystem, additional
steps might be required, such as installing specific packages or manually specifying the filesystem type
with the -t option.
Step 5: Access the Flash Drive
Once the flash drive is successfully mounted, you can access its contents through the mount point you
created. Open your file manager (such as Nautilus) and navigate to the "usb" directory (or the name you
chose for the mount point). Here, you'll see all the files and folders stored on the flash drive, and
you can interact with them just like any other files on your system.
Step 6: Unmount the Flash Drive
When you're done using the flash drive, it's important to unmount it properly before physically removing
it. Open a terminal and execute the following command:
baden@erb:~$ sudo umount ~/usb
NOTE: The command says umount, not unmount! Running unmount will do nothing.
This command unmounts the flash drive from the mount point. After receiving a confirmation message, you
can safely remove the flash drive from the USB port.
Mounting a removable flash drive on Ubuntu is a simple process that enables you to access and manage its
contents seamlessly. By following the steps outlined in this guide, you can ensure a smooth and
hassle-free experience when working with USB drives in Ubuntu. Whether you need to transfer files,
create backups, or carry important data with you, Ubuntu provides a user-friendly environment for
interacting with removable flash drives.